Thursday, June 14, 2012

Getting Started with Your Web Experience - An Application for online tutorials and other useful stuff

Just come across today this really useful site on on-line tutorial for WebSphere Portal and Web Content Management.
http://infolib.lotus.com/resources/gs/portal8/

You can filter the tutorials based on the roles like developer or Administrator etc and also categorized the learning path from basic to Beyond basic and Special Features.


The printer version of the tutorials are also available in PDF format to download and go through off-line if you want.

Friday, May 4, 2012

IBM WebSphere Portal Mobile Experience V7.0 - WebSphere Portal Mobile Theme

Heard quite a bit about IBM WebSphere Portal Mobile Experience V7.0 and one fine day got a call to setup a  POC for that. Excited!!! I have been kept in dark before this specifically in the Mobile Portal space. So before jumping in, I have started looking out for useful information on the net. I have included some really good resources in the reference section which you can access for more details.

So, my first task was to download IBM WebSphere Portal Mobile Experience V7.0 and install it. It's available under  IBM Solutions Catalog on the Lotus Greenhouse community site.
Here are the steps how you can install it and apply it to the portal pages. The prerequisite is to download and install IBM WebSphere Portal Solution Installer.
  1. Download Solutions Installer from the catalog: IBM WebSphere Portal Solution Installer.
  1. Download the “SolutionInstaller_1.2.0.4.zip” and extract it in a respective folder.
  2. Extract the SolutionInstaller.zip file to a temporary directory. For example: C:\temp\
  3. Find settings.properties in the C:\temp\SolutionInstaller\commands\windows directory.
Set Profile_Directory as follows..
Profile_Directory=C:/IBM/WebSphere/wp_profile

  1. Execute the command for installation of "install-SolutionInstaller.bat" in the following location.
In our case : D:\IBM7\WebSphere\wp_profile\ConfigEngine

  1. Locate the mobile_theme.paa included with the IBM WebSphere Portal Mobile Experience catalog package.
  2. From the ConfigEngine prompt, run this command to install the .paa file
Windows: ConfigEngine.bat  install-paa -DPAALocation=
-DofferingName=PortalServer

  1. From the ConfigEngine prompt, enter this command to configure the .paa file:
Windows: ConfigEngine deploy-paa -DappName=theme -DofferingName=PortalServer
-DhostlnJMX==
In our case : ConfigEngine.bat deploy-paa -DappName=theme -DofferingName=PortalServer
-DhostlnJMX==idr-portal.yash.com
You have to wait for some time as it will take few mins to complete the deployment.

    1. After the deployment is successful, restart WebSphere® Portal.
    2. Now check the Themes and Skins Page in the IBM WebSphere Portal Console to ensure that Mobile Theme is now deployed in the Portal.
     
    1. Now create a New Page and add the theme to "Mobile" theme.
    2. Deploy the same portlet in 2 pages- One with Mobile theme and the other with page Builder theme and check the difference.
    3. The portal view in Non-Mobile theme (Page Builder theme)
    1. The portal view in Mobile theme.
    1. Location of Mobile theme.
    D:\IBM7\WebSphere\PortalServer\theme\wp.theme.themes\mobile\installedApps\wp.theme.themes.mobile.ear\wp.theme.themes.mobile.war\themes\html

Some Useful References:


Wednesday, April 25, 2012

How to use WebDAV to develop themes in Portal 7.x

Since last few days, I was involved in working with themes in Portal 7.x specifically PageBuilder2 using WebDAV. Must say lot has changed since older version of Portals like 6 & 6.1. With introduction of WebDAV IBM has taken a great leap in managing static and the dynamic resources of themes & skins. There is enough documentation available over the net regarding usage of WebDAV with portal. This post won't give you any extra stuff rather intention is to group all the relevant details at one location. I would demonstrate how to setup and use WebDAV client to work with themes and gradually will take you through more details of themes and skins. Special thanks to my colleague Devendra Dhoot for his technical support in exploring the architecture of new themes & skins.


First let's understand what's WebDAV and what are the entry points provided to connect with Portal.


WebDAV is Web-based Distributed Authoring and Versioning (WebDAV) - an HTTP extension framework with a plug point for the access and management of hierarchical data. WebDAV stores the data in collections and allows you to work with the data in a user interface view that is similar to that of a file system. Various tools are available for integrating WebDAV resources into the client file system, known as WebDAV clients. To use WebDAV you must first download the WebDAV client or there may be inbuilt depending on the OS you have.


Different WebDAV entry points in websphere portal and WCM are listed below.
  • To access the Portal Themes
        http://:10039/wps/mycontenthandler/dav/themelist
        http://:10039/wps/mycontenthandler/dav/themelist/all
        http://:10039/wps/mycontenthandler/dav/fs-type1/themes

You can also directly access a specific theme by providing its friendly name, unique name, or object ID to the URL above

Note: Some WebDAV clients don't work with /themelist, for them you need them you need to suffix '/all'.  
  • To access the Portal Skins
        http://:10039/wps/mycontenthandler/dav/skinlist
        http://:10039/wps/mycontenthandler/dav/skinlist/all
        http://:10039/wps/mycontenthandler/dav/fs-type1/skins

You can also directly access a specific theme by providing its friendly name, unique name, or object ID to the URL above
  • To access the Static Resources
        http://:10039/wps/mycontenthandler/dav/fs-type1
You can access the 'PageBuilder2' theme and other static resources like layouts,common-resources from here.

  • Entry point to access the Portal Pages
  1. Base portal installation                     http://:10039/wps/mycontenthandler/dav/contentmodel/wps.content.root/
  2. virtual portal
    1. By host name   http://virtual_portal_host_name:port_number/wps/mycontenthandler/dav/contentmodel/wps.content.root
    2. By URL context http://:10039/wps/mycontenthandler/URL_context_of_VP/!ut/p/dav/contentmodel/wps.content.root/

  • Entry point to access WCM libraries    http://:10039/portal_context_root/mycontenthandler/dav/content/libraries/
The WebDAV tree containing your Web content items begins at the WebDAV root /libraries/, which displays all libraries to which you have access. All Web content items within the libraries are organized with folders and files. Folder Structure looks like

libraries
   - wcm.library.my_library
       - authoringTemplates
       - components
       - presentationTemplates
       - sites
       - taxonomies
   - wcm.library.contentlibrary
       - components
       - presentationTemplates
       - sites
       - taxonomies
You can use following available WebDAV clients atleast on Windows.

    WebFolders
    WebFolders are a Windows Explorer extension that allow you to read and open WebDAV resources by using Windows Explorer (file explorer). 

    Bitkinex
    BitKinex integrates the functionality of an innovative FTP, SFTP and WebDAV client for Windows. 

    WebDrive
    WebSphere Portal supports the commercial WebDAV client WebDrive. 

    AnyClient
    WebSphere Portal supports the commercial WebDAV client AnyClient V 2.x. 

I have installed Bitkinex to connect to my WebSphere Portal Server. Here are the steps on how to connect.

Step-1 : Download and setup the Bitkinex as below.

You need to provide portal server host name and the port along with user credentials to connect with portal.

Step-2 : Setup the entry points for WebDAV as shown in the snapshot below.


Step-3 : You can connect to the /themelist/all entry point for theme and view the content.


Step-4 : Connect to the /fs-type1/ entry point to see the static resources.


Step-5 : Connect to the /fs-type1/themes/ and /fs-type1/skins/ entry points to view the static resources for themes & skins.


Step-7 : Now connect to the contentmodel/wps.content.root/ entry point for accessing portal pages. Please keep in mind that you can only change the metadata of page and can not create/delete/move/copy a page.


Step-8 : Connect to the content libraries using content/libraries/ entry point.


Hope this will get you started playing with new theme in WebSphere Portal 7. For more details on WebDAV and how to create theme using it, please find below some useful references.


Wednesday, March 14, 2012

List of Troubleshooting Tools for WebSphere Application Server

There are many diagnostic tools for troubleshooting applications deployed to WebSphere Application Server. Because it can be difficult to find the right tool for the problem at hand this document summarizes the primary tools to choose from when you begin troubleshooting a problem.

Here is a useful technote from IBM.

Thursday, March 1, 2012

Implementing a Terms of Use (TOU) Acknowledgement in WebSphere Portal

 Here is a really nice article/post from Glenn Kline of Perficient which explains the steps to implement TOU acknowledgement in Portal. This is a common requirement in organizations having portal implementations and in the absence of any out of the box capability this post really comes to rescue.


Monday, February 27, 2012

How to enable impersonation in WebSphere Portal

Working on one POC for the prospect and got the use case which is complete fit for the recently added impersonation feature in WebSphere Portal 6.1.x. Before drill down on how to enable this new feature first let's look at what exactly the impersonation means and how it is useful. This blog post provides same steps and info on impersonation as infocenter and Portal wiki but with some useful screenshots for easy understanding.

WebSphere Portal 6.1.5 has a feature called Impersonation that allows a user, such as a support specialist, to access another user's system to test out a new page, portlet, etc. and to see any issues as they occur on the end user system. In this case the support specialist assumes the profile of the end user with security access, user profile attributes, portal pages and portlet customizations.

Now let's see how to enable impersonation service in portal.

  • Log on to the WebSphere® Application Server or Network Deployment Administration Console.
  • Navigate to Resources -> Resource Environment -> Resource Environment Providers -> WP AuthenticationService -> Custom Properties

  • Click New.
    • Enter logout.explicit.filterchain in the Name field.
    • Enter com.ibm.wps.auth.impersonation.impl.ImpersonationLogoutFilter in the Value field.

  • Click Apply and then click Save to save the changes directly to the master configuration.
  • Navigate to Resources -> Resource Environment -> Resource Environment Providers -> WP  PortletServiceRegistryService -> Custom Properties.
  • Click New.
    •  Enter jndi.com.ibm.portal.portlet.service.impersonation.ImpersonationService in the Name field.
    •  Enter com.ibm.wps.portletservice.impersonation.impl.ImpersonationServiceImpl in the Value field. 

  • Click Apply and then click Save to save the changes directly to the master configuration.
  • Portal Access Control provides the ability to impersonate other users. For this reason, you must assign the Can Run As User role (WPS7.0) on the USERS virtual resource to the user (eg. wpsadmin) you plan as  impersonator after you enable the impersonation feature.
  • Moving ahead with WPS 7.0, you are provided with default impersonation portlet. Login to portal and navigate to the impersonation link at the top of the banner as shown in the below screen.
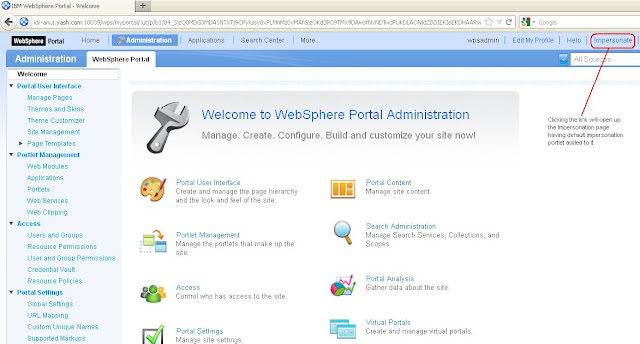
  • In the Impersonation Portlet, search for the user you want to impersonate. For example : Test User

  •  Click on the Impersonate button on the portlet and you will be presented with the view of Test User's portal session.

Few known limitations of Impersonation
  • Client side aggregation does not support user impersonation. For this reason, ensure you do not activate client side aggregation on any portal pages where the impersonation portlet is deployed.